Lab 6: Callbacks and Timers
Overview
In this lab, you will be combining HTML, CSS, and JavaScript to build a nice-looking digital clock. The clock should accurately display the current time in seconds and properly update itself to show the current time. You should also use CSS to make the digital clock look like a real physical clock.
Part 1: Designing the Clock
Please use HTML and CSS to design a digital clock. You'll want to use things like borders and background colors to draw shapes and maybe CSS Grid or flexbox to get elements to show up in the correct place. You can use whatever HTML elements you want (within reason) to represent the different parts of the clock and in this part, you do not need to make the numbers advance. For now, just show any hardcoded time that you want.
You can make the clock look however you want but it must have the following features (think like a digital alarm clock):
- A screen that shows the time
- A time with hours, minutes, and seconds (hardcoded and unchanging for now)
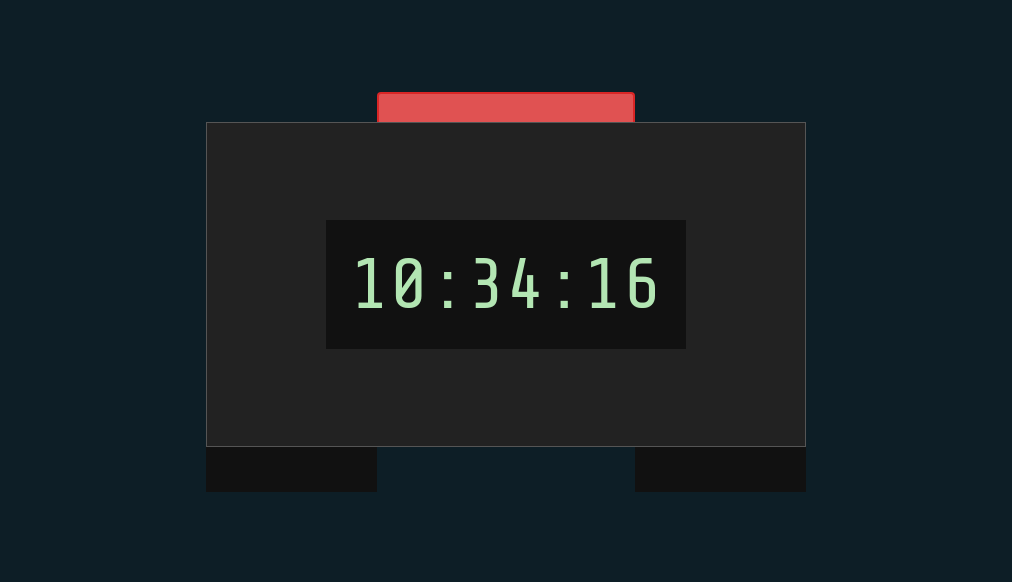
- A "body" for the screen to be mounted inside (digital clocks usually aren't a screen floating in space)
- Two or more legs/feet for the clock to sit on
- A button on the top (doesn't need to do anything)
Please use "basic" HTML elements like divs, sections, paragraphs, etc rather than images to build your clock. In this case you are trying to artistically arrange some HTML elements to make them look like a clock (rather than showing a picture of a clock)
Here's the general kind of thing I'm looking for although yours can look different:

If you want to get fancy with the design or the HTML, definitely feel free. Here's the HTML I used to get the image above (CSS not shown)
<html>
<head></head>
<body>
<div class="clock-container">
<button></button>
<main>
<time>
10:34:16
</time>
</main>
<footer></footer>
<footer></footer>
</div>
</body>
</html>
Part 2: Getting the Time Accurate
Now that you have a web page with a component that looks like a digital clock, you can work on updating the time that the clock displays. In this section, please create a button that will just reset the clock to the current time. After you click the button, the time does not need to continue ticking. It just needs to get set to the current time.
How does this work?
Ideally, you have a single HTML element that contains the time as text. In this section, you will be writing some JavaScript to update the time in this HTML element. Please use JavaScript to get a reference to the time-holding element (maybe document.getElementById). When you go to update the time in the clock, you will probably be changing the innerText of that element. There can be an onclick attribute on your update button to trigger the time update.
Getting the current time in JavaScript
We have not covered in class yet how to get the current time in JavaScript. There are two steps to that. First, you create a Date object and then you use a method in the Date object to get the current hour, minute, second, etc. It looks like this:
const dateAndTime = new Date();
const currentHour = dateAndTime.getHours();
const currentMinute = dateAndTime.getMinutes();
const currentSecond = dateAndTime.getSeconds();
You can then go and use those values to set the text of the digital clock
Part 3: Making the time update
In this section, you should update your site to have the time on the clock update properly as time passes. This actually should not be super tricky to implement. Since you should already have a function in part 2 to set the time on the clock to the "right" time, all you should need to do in this section is to call that function on a regular schedule. At the time you're starting this lab, we will not have gone over how to call functions on a regular schedule. We will be going over this in the following class but if you want to look ahead, you might want to take a look at the MDN setInterval documentation
You should end up using either setTimeout or setInterval to make your clock tick on a regular interval. Whenever your clock "ticks", it should update to the proper time using the function above.
Submitting
As usual, to submit this lab, please create a single zip file and upload it to Canvas under the appropriate assignment. The zip file should contain all of the source code you generate in this lab.